
>>

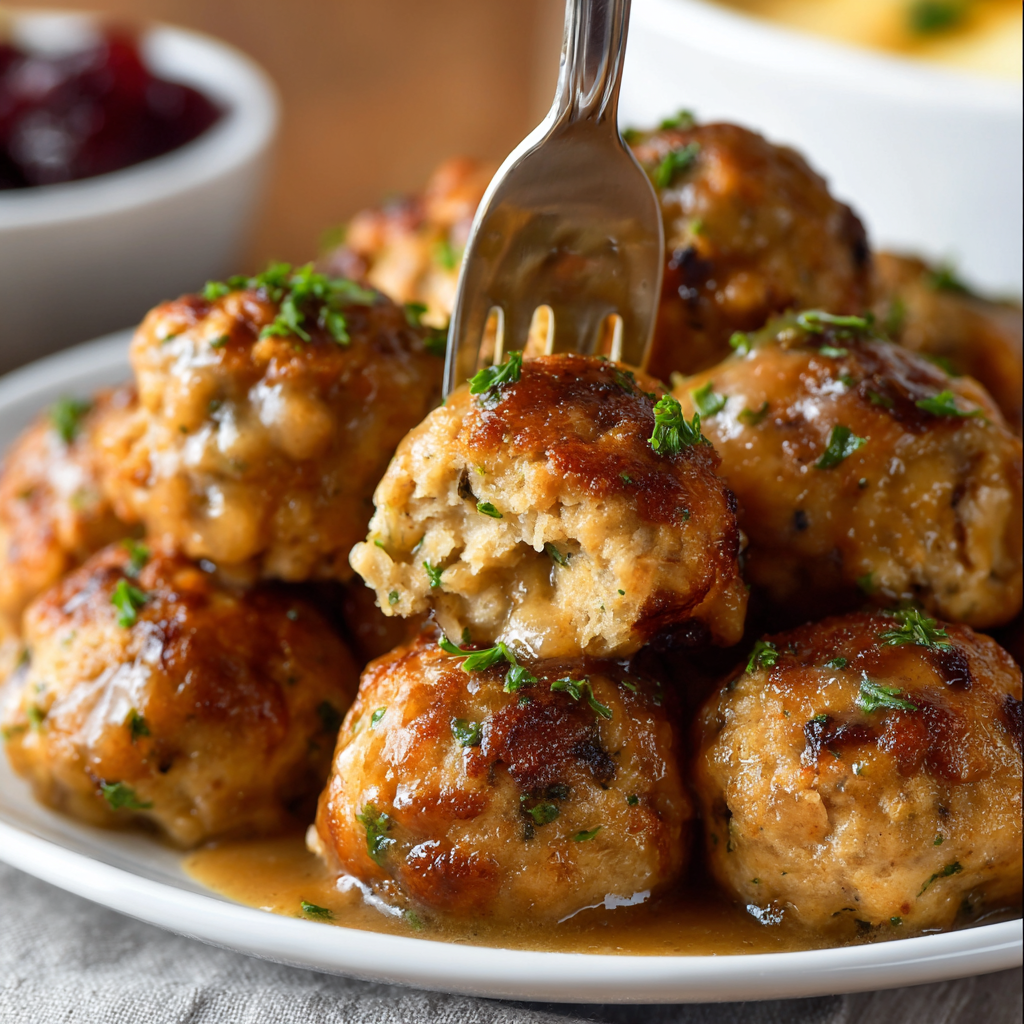
Golden, bite-sized stuffing balls with savory herbs, sautéed aromatics, and a crisp exterior—perfect as a side or finger-food centerpiece for holiday gatherings.

This simple, soulful recipe for Thanksgiving stuffing balls has been a holiday staple in my family for as long as I can remember. I first learned to shape these into small rounds one November when a crowded oven and a lively kitchen made a giant pan impractical. Shaping the mixture into individual balls not only sped up cooking time, it created a delightfully crunchy exterior while preserving that soft, herb-flecked interior that everyone associates with comfort food. I love the contrast of textures and how each bite captures the warm, familiar flavors of the season.
I discovered this technique by accident—leftover stuffing that had been reshaped and reheated turned out surprisingly addictive. Over the years I've refined the base: day-old bread toasted gently, butter-sautéed onions and celery for sweetness and depth, a gentle hand with poultry seasoning so the herbs sing without overpowering, and a finish of chopped parsley and optional Parmesan for umami. These balls are versatile: make them as a neat side for the holiday table, serve them as handheld appetizers at a cocktail-style gathering, or pack them for make-ahead meals where they reheat beautifully.
Personally, my kids declared these "the best part of dinner" the first year I served them. Guests love grabbing them with their hands, and I love that they travel well to potlucks. Over the years I've learned to keep a bowl of melted butter nearby for guests who like an extra sheen and a sprinkle of fresh parsley right before serving for color.
My favorite thing about these is how they transform leftover or stale bread into something celebratory. Once I brought a tin of extras to a neighbor after Thanksgiving and they called it a "gourmet snack." It’s a simple pleasure—compact, crispy, and full of the herbal warmth that defines the season.
Cool completely before storing to avoid steam building up. For short-term storage, place the cooled balls in an airtight container and refrigerate for up to 3 days. Reheat at 350°F for 10–12 minutes until warmed through and crisp. For longer storage, freeze the raw balls on a tray until solid, then transfer to a freezer-safe bag for up to 3 months. Bake from frozen at 375°F, adding 5–8 minutes to ensure the interior is fully cooked. Use parchment or lightly oiled tins to prevent sticking and preserve the crisp exterior.
Vegetarian: swap chicken/turkey broth for a rich vegetable broth and omit Parmesan or use a plant-based alternative. Gluten-free: use a sturdy gluten-free loaf with good structure and dry it thoroughly before cubing. Dairy-free: replace butter with olive oil or a vegan butter and omit the Parmesan or use nutritional yeast for a savory lift. Herbs: fresh sage and thyme can replace poultry seasoning (1 tsp each) for a brighter profile. If the mixture feels too loose, add extra toasted bread cubes 1/4 cup at a time until the right consistency is reached.
Serve warm as a side to roasted turkey or alongside a gravy boat for dipping. For appetizer service, place a bowl of herbed yogurt or turkey gravy nearby and garnish the balls with chopped parsley and a sprinkling of grated Parmesan. Pair with roasted root vegetables or a bright winter salad with citrus vinaigrette to balance the richness. These also work on a charcuterie-style board as a hearty, hand-held option for guests.
Stuffing itself is a long-standing holiday tradition across many Western cuisines, evolving from classic bread-based fillings used to flavor roasted birds. The practice of shaping the mixture into individual rounds is a more modern, convivial twist—rooted in practical convenience and a love of bite-sized foods. Variations appear across regions: some include sausage and apples in New England, while others add cornbread and sage in Southern kitchens. This small-ball version borrows the classic ingredients but modernizes service and presentation.
Winter: add chopped dried cranberries and toasted pecans for a festive sweet-salty contrast. Spring: lighten with increased fresh parsley and a squeeze of lemon zest. For holiday parties, fold in cooked, crumbled breakfast sausage and swap parsley for chives for a savory twist. During colder months, a tablespoon of browned butter whisked into the mixture before shaping deepens the flavor and yields a nuttier aroma.
Make the toasted bread cubes and sauté the vegetables a day ahead—store them separately in airtight containers. Combine, bind, and form balls the next day for fast baking. For frozen prep, shape balls and flash-freeze on a sheet tray before transferring to bags; on the day, bake directly from frozen and keep a careful eye on time. Label containers with date and contents so holiday-day chaos doesn’t derail timing.
These stuffing balls are a little celebration in every bite—simple to prepare, generous in flavor, and endlessly adaptable. Make them your own, share them with the people you love, and keep a few extras for snacking later. Happy cooking and happy holidays!
Toast the bread first to control moisture; it prevents a gummy center and gives better texture.
Use damp hands when forming balls to prevent sticking and ensure uniform shapes.
If the mixture feels too wet, add extra toasted bread cubes 1/4 cup at a time until it holds when pressed.
For extra crispness, flip the balls halfway through baking or broil for 1–2 minutes at the end while watching carefully.
This nourishing thanksgiving stuffing balls recipe is sure to be a staple in your kitchen. Enjoy every moist, high protein slice — it is perfect for breakfast or as a wholesome snack any time.
This Thanksgiving Stuffing Balls recipe makes perfectly juicy, tender, and flavorful steak every time! Serve with potatoes and a side salad for an unforgettable dinner in under 30 minutes.
Spread bread cubes on a baking sheet and toast in a 300°F oven for 10–12 minutes until dry but not browned. Cool completely before combining.
Melt butter in a large skillet over medium heat. Add onion and celery and sauté 6–8 minutes until soft. Add garlic in the last minute and cook until fragrant.
In a large bowl, combine toasted bread, cooked vegetables, poultry seasoning (or sage + thyme), salt, pepper, parsley, and Parmesan if using.
Stir in the beaten eggs, then slowly add 1 1/2 cups of broth until the mixture is moist and holds together when pressed. Add more broth or bread cubes a little at a time as needed.
With damp hands, form the mixture into golf-ball-sized rounds and arrange on a greased or parchment-lined baking sheet.
Preheat oven to 375°F and bake for 20–25 minutes until golden brown and crisp on the outside. Flip once halfway through for even color if desired.
Last Step: Please leave a rating and comment letting us know how you liked this recipe! This helps our business to thrive and continue providing free, high-quality recipes for you.
Leave a comment & rating below or tag
@aiolirecipe on social media!

A cozy, colorful salad that celebrates autumn flavors — roasted butternut squash and Brussels sprouts tossed with pasta, cranberries, pecans, and tangy feta, finished with a balsamic vinaigrette.

Bright, tangy cilantro-lime marinated flank steak served over rice with black beans, corn, fresh veggies and creamy avocado for a fast, healthy weeknight bowl.

Buttery crescent rolls filled with a sweet pecan pie–inspired filling — a quick, crowd-pleasing dessert perfect for holidays or weeknight cravings.
Leave a comment & rating below or tag @aiolirecipe on social media!
Enjoyed this recipe? Share it with friends and family, and don't forget to leave a review!
This recipe looks amazing! Can't wait to try it.
Comments are stored locally in your browser. Server comments are displayed alongside your local comments.
Join to receive our email series which contains a round-up of some of our quick and easy family favorite recipes.
