
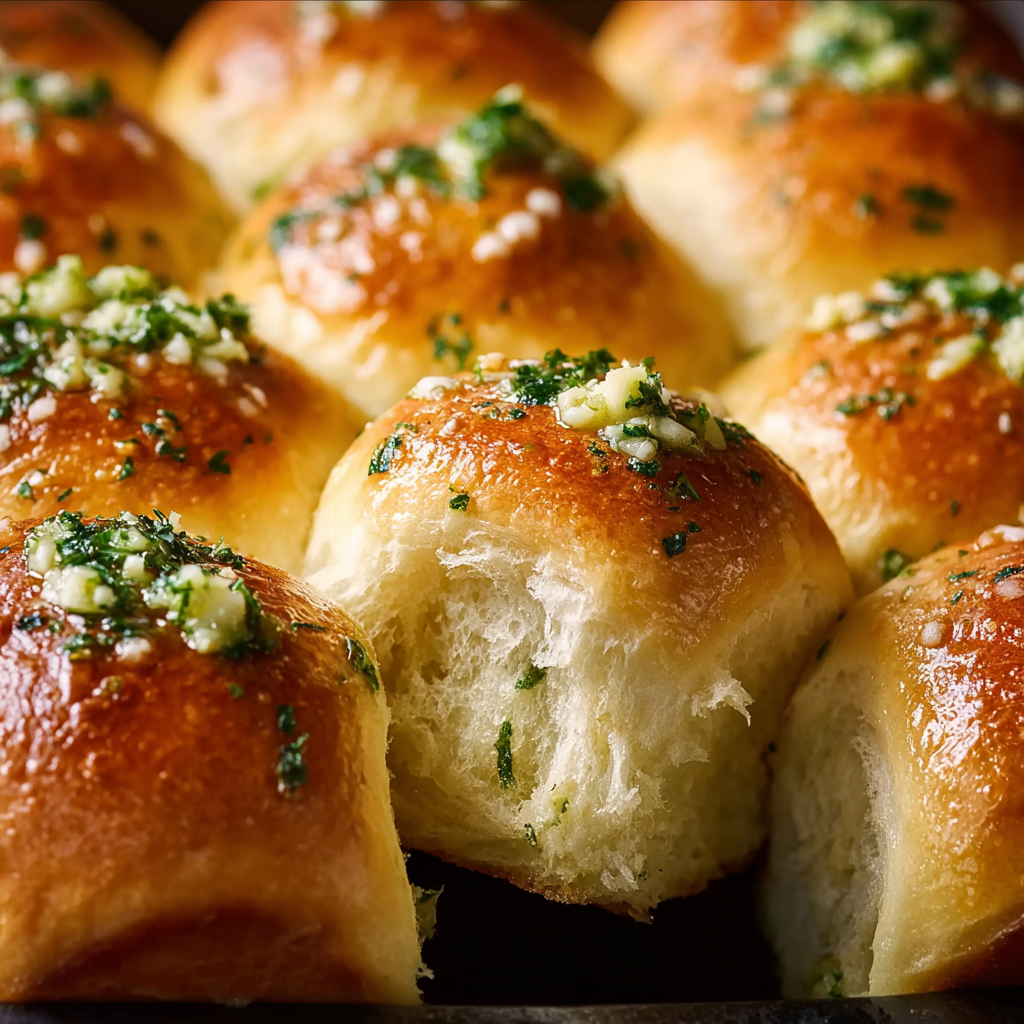
Soft & Buttery Garlic Rolls

Pillowy, buttery rolls infused with garlic in the dough and finished with a glossy garlic-butter brush — perfect for breakfast, dinner, or sharing with friends.
Why You'll Love This Recipe
- Soft, pillowy texture achieved through a short knead and proper first rise — rolls are light but hold their shape.
- Double garlic infusion: garlic in the dough for background depth and garlic-butter brushed after baking for aroma and shine.
- Quick to prepare: about 20 minutes active work and one uninterrupted rise — ready to serve in under 90 minutes.
- Uses pantry staples (flour, milk, butter, yeast, egg) plus fresh garlic and parsley for bright flavor — no hard-to-find items.
- Make-ahead friendly: shape the rolls the night before and refrigerate for an easy morning bake with fresh-baked aroma.
- Versatile: serve at breakfast, dinner, or as an accompaniment to stews, salads, and holiday spreads.
In my kitchen these rolls quickly became the go-to when I wanted something comforting but special. Neighbors, family, and friends consistently ask for the recipe because the combination of tender crumb and buttery garlic topping is universally appealing. I learned that a gentle hand at shaping and a warm proofing spot make all the difference — tiny tricks I share throughout this guide.
Ingredients
- All-purpose flour (3 1/2 cups): Look for a standard 10–12% protein flour for good gluten development. Spoon and level when measuring for accuracy; King Arthur or Gold Medal work well.
- Granulated sugar (2–3 tablespoons): Sugar feeds the yeast and adds subtle caramelization. Use 2 tablespoons for slightly less sweet rolls, 3 tablespoons for a softer crust.
- Instant yeast (2 1/4 teaspoons): Also sold as rapid-rise or quick yeast; sprinkle directly into the dry ingredients and you can skip proofing in water.
- Salt (1 teaspoon): Essential for flavor control and strengthening the dough structure; use fine sea salt for even distribution.
- Milk (1 cup, warmed): Whole milk or 2% warmed to about 100–110°F helps create a tender crumb and encourages yeast activity.
- Unsalted butter (4 1/2 tablespoons, melted): Adds richness to the dough; reserve a little extra to brush on the rolls after baking.
- Large egg (1, room temperature): Contributes to structure and color in the crust; bring it to room temperature to mix evenly.
- Fresh garlic (2 tablespoons, finely minced): Mince very fine so it disperses through the dough without large pockets; use firm, fresh bulbs for bright flavor.
- Fresh parsley or herbs (3 tablespoons, chopped, optional): Flat-leaf parsley adds freshness; thyme or oregano offer different aromatic profiles if preferred.
- Garlic butter brush: 2 tablespoons melted butter, 1 tablespoon minced garlic, 1 tablespoon chopped parsley; optional flaky sea salt for finishing.
Instructions
Mix the Dry Ingredients: In a large bowl combine 3 1/2 cups flour, 2–3 tablespoons sugar, 2 1/4 teaspoons instant yeast, and 1 teaspoon salt. Whisk briefly to distribute. Using instant yeast saves a step because it mixes directly with dry ingredients — no bloom needed — but ensure your milk is warm, not hot, to avoid killing the yeast. Add Wet Ingredients and Garlic: Whisk together 1 cup warmed milk, 4 1/2 tablespoons melted butter, and 1 large room-temperature egg. Pour into the dry mix and add 2 tablespoons finely minced garlic and 3 tablespoons chopped parsley. Stir until a shaggy dough forms. The garlic will mellow in the finished roll and infuse the crumb during rising. Knead Until Smooth: Turn the dough onto a lightly floured surface and knead 6–8 minutes by hand until smooth and slightly elastic, or 4–5 minutes on medium speed with a dough hook. The dough should be soft and tacky but not sticky; add a tablespoon of flour at a time if excessively sticky. Proper gluten development gives the rolls their airy interior. First Rise: Place the dough in a lightly oiled bowl, cover with plastic wrap or a damp towel, and let rise in a warm spot until doubled, about 45–60 minutes. Avoid drafts; a warm oven (turned off) with the light on makes a reliable proofing environment. The dough should gently spring back when pressed. Shape Rolls: Punch the dough down gently to release gas. Divide into 12 even pieces (about 2 ounces each) and shape into smooth balls by tucking edges underneath and rolling on the counter. Arrange on a parchment-lined baking sheet or in a 9x13-inch pan slightly apart for soft sides. Second Rise: Cover and let rise again until puffy and nearly doubled, 25–35 minutes. This second proof ensures lightness; if you refrigerate overnight, allow extra time at room temperature before baking. Bake: Preheat oven to 375°F. Bake the rolls 16–20 minutes until golden brown and the internal temperature reads about 190–195°F. Rotate the pan halfway through baking for even color. Avoid overbaking; the rolls should feel soft when pressed lightly. Brush with Garlic Butter: Immediately after removing the rolls, brush with a mixture of 2 tablespoons melted butter, 1 tablespoon minced garlic, and 1 tablespoon chopped parsley. Optional: sprinkle flaky sea salt for contrast. The warm butter soaks into the top for shine and added flavor.
You Must Know
- High in comfort value: each roll provides a balance of carbohydrates and fats — freezes well for up to 3 months.
- Storage: keep in an airtight container at room temperature for 2 days or refrigerate up to 5 days; reheat gently to refresh texture.
- Nutrition: each roll is rich due to butter and milk — great as a side but not a low-calorie main by itself.
- Technique benefit: folding garlic into the dough prevents a one-note surface flavor and distributes savory notes through every bite.
My favorite part of these rolls is the immediate aroma when I open the oven: the garlic butter fills the kitchen and invites people into the room. Family gatherings often revolve around a tray of these; I’ve learned that allowing the second rise properly makes them feel homemade, not store-bought. A well-proofed roll shows a tender crumb without dense pockets, and that’s the sign I look for when pulling them from the oven.

Storage Tips
Store cooled rolls in an airtight container at room temperature for up to 48 hours. For longer storage, freeze individually wrapped rolls in freezer-safe bags for up to 3 months. Reheat frozen rolls at 325°F wrapped in foil for 10–15 minutes, or microwave a single roll for 15–20 seconds and finish in a toaster oven for a crisp top. Avoid leaving butter-brushed rolls uncovered, as the butter will dry and the crust may toughen.
Ingredient Substitutions
If you want dairy-free rolls, substitute plant-based milk and vegan butter — flavor will be similar but slightly less rich. For an egg-free option, replace the egg with 3 tablespoons Greek yogurt or 2 tablespoons applesauce and a tablespoon of oil; texture will be slightly softer. Swap fresh herbs for 1–2 teaspoons dried if fresh are unavailable, but reduce quantity to avoid overpowering the dough. Whole wheat flour up to 25% can be used for more structure and nuttiness; expect denser rolls and slightly longer proofing.
Serving Suggestions
Serve warm with soups, stews, roasted meats, or a breakfast spread. They pair especially well with tomato-based soups, roasted garlic butter, or a compound herb butter. For a party, split and fill with slices of roasted turkey and greens for mini sandwiches. Garnish with extra chopped parsley and flaky sea salt for an elegant finish.
Seasonal Adaptations
In spring swap parsley for chives and add lemon zest to the butter brush for brightness. In autumn incorporate 1 tablespoon of roasted garlic paste for deeper caramelized flavor. For winter holidays, add a pinch of rosemary to the dough and finish with honey-butter for a festive twist that pairs beautifully with roast poultry.
Meal Prep Tips
To bake fresh in the morning, shape rolls the night before, place them on a baking tray covered, and refrigerate. In the morning, allow 30–45 minutes at room temperature, preheat the oven, and bake as directed. For busy weeks, freeze baked rolls in groups of four; thaw and reheat as needed. Use portioned dough balls in meal-prep containers for quick assembly and even baking.
These rolls have become a reliable favorite in my home because they are both forgiving and rewarding: small technique choices yield noticeably better results, yet the dough is approachable for new bakers. Share them, tweak the herbs, and make them your own — fresh-baked rolls always bring people together.
Pro Tips
Warm the milk to 100–110°F (about body temperature) to activate yeast without killing it.
Knead just until smooth; over-kneading can produce a tough crumb on small rolls.
Use a light dusting of flour when shaping to avoid sticking but keep additions minimal to preserve tenderness.
Brush immediately after baking so the butter soaks into the warm crust for shine and flavor.
If refrigerating dough overnight, allow extra time at room temperature before baking.
This nourishing soft & buttery garlic rolls recipe is sure to be a staple in your kitchen. Enjoy every moist, high protein slice — it is perfect for breakfast or as a wholesome snack any time.
FAQs about Recipes
How warm should the milk be?
Yes. Warm the milk to about 100–110°F before mixing; too hot will kill the yeast.
Can I freeze these rolls?
Wrap cooled rolls tightly and freeze up to 3 months. Reheat at 325°F wrapped in foil for 10–15 minutes.
Tags
Soft & Buttery Garlic Rolls
This Soft & Buttery Garlic Rolls recipe makes perfectly juicy, tender, and flavorful steak every time! Serve with potatoes and a side salad for an unforgettable dinner in under 30 minutes.
Ingredients
Dough
Garlic Butter Brush
Instructions
Mix the Dry Ingredients
Whisk together flour, sugar, yeast, and salt in a large bowl to ensure even distribution of leavening and seasoning.
Add Wet Ingredients and Garlic
Combine warmed milk, melted butter, and egg, then stir into dry ingredients. Add minced garlic and parsley so flavor integrates into the dough.
Knead Until Smooth
Knead by hand 6–8 minutes or with a dough hook 4–5 minutes until the dough is smooth and slightly elastic, tacky but not sticky.
First Rise
Place dough in an oiled bowl, cover, and let rise for 45–60 minutes until doubled in a warm place.
Shape Rolls
Divide into 12 portions, shape into smooth balls, and arrange on a parchment-lined baking sheet or pan.
Second Rise and Bake
Let rise another 25–35 minutes, then bake at 375°F for 16–20 minutes until golden and an internal temperature of 190–195°F.
Brush with Garlic Butter
Brush warm rolls with melted butter mixed with minced garlic and parsley; sprinkle flaky sea salt if desired.
Last Step: Please leave a rating and comment letting us know how you liked this recipe! This helps our business to thrive and continue providing free, high-quality recipes for you.
Nutrition
Did You Make This?
Leave a comment & rating below or tag
@aiolirecipe on social media!
Categories:
You might also like...

Fall Harvest Pasta Salad
A cozy, colorful salad that celebrates autumn flavors — roasted butternut squash and Brussels sprouts tossed with pasta, cranberries, pecans, and tangy feta, finished with a balsamic vinaigrette.

Cilantro Lime Steak Bowls
Bright, tangy cilantro-lime marinated flank steak served over rice with black beans, corn, fresh veggies and creamy avocado for a fast, healthy weeknight bowl.

Pecan Pie Crescent Rolls
Buttery crescent rolls filled with a sweet pecan pie–inspired filling — a quick, crowd-pleasing dessert perfect for holidays or weeknight cravings.
Did You Make This?
Leave a comment & rating below or tag @aiolirecipe on social media!
Rate This Recipe
Share This Recipe
Enjoyed this recipe? Share it with friends and family, and don't forget to leave a review!
Comments (1)
This recipe looks amazing! Can't wait to try it.
Comments are stored locally in your browser. Server comments are displayed alongside your local comments.
Hi, I'm Olivia!
What's Popular

30-Minute Meals!
Join to receive our email series which contains a round-up of some of our quick and easy family favorite recipes.