
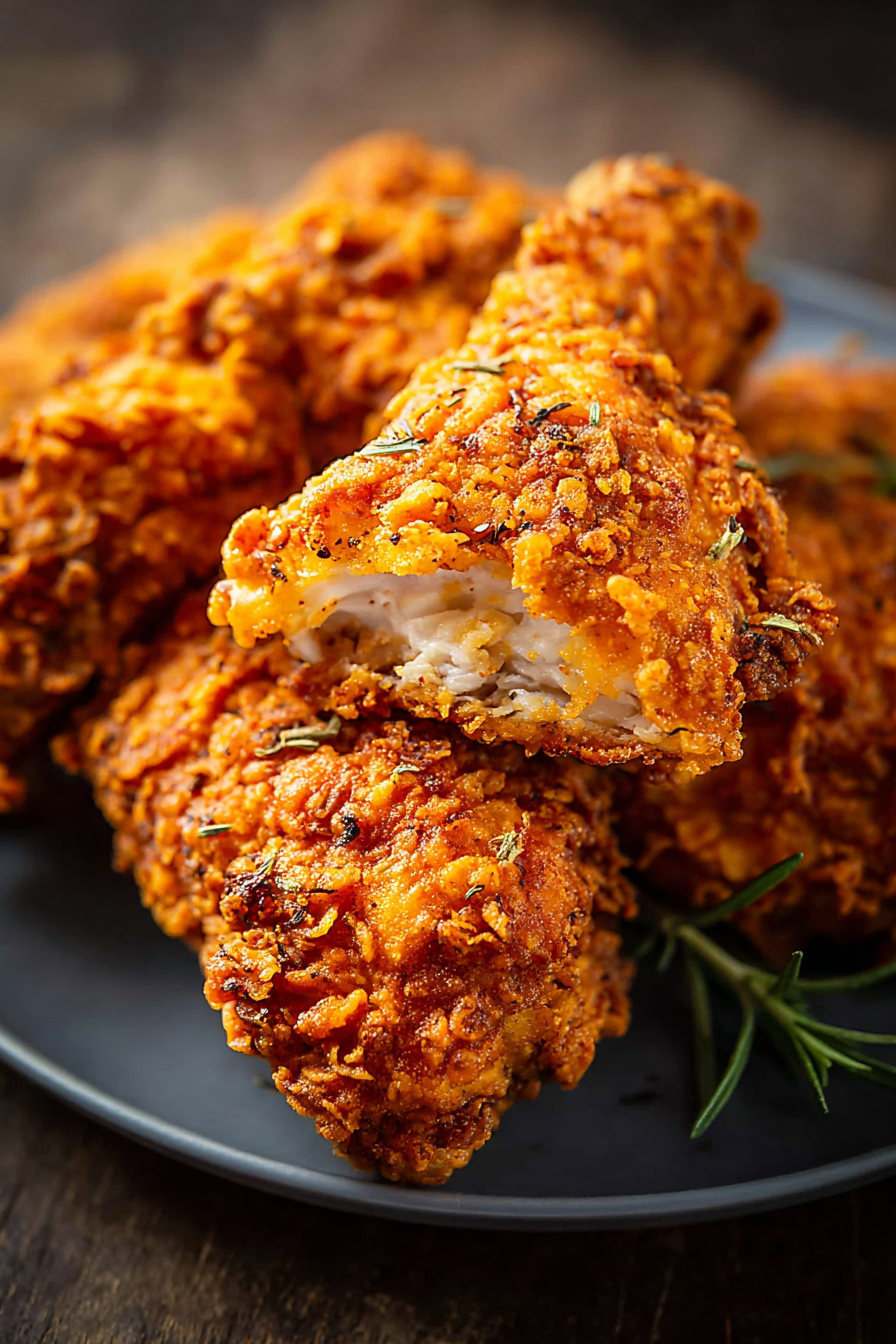
KFC-Style Crispy Fried Chicken

A homemade take on the classic KFC-style crunchy chicken — double-dredged, spiced with familiar herbs, marinated in buttermilk for juicy results and fried until golden.

This KFC-style crunchy chicken has a permanent spot in my weeknight rotation and on holiday tables. I first landed on this exact blend of herbs and spices while trying to recreate the familiar bucket from my childhood — the goal was a deeply seasoned crust with tender, juicy meat and a slightly peppery finish. After a few experiments I settled on a double-dredge method with a buttermilk-and-egg soak that gives the coating exceptional adhesion and bite. The result is a golden, crackly crust and a moist interior that pulls apart with a satisfying sheen.
I discovered this method during a slow Sunday afternoon when I had three pounds of mixed chicken pieces and a craving for something that felt both nostalgic and reliably good. The spice mix — a balance of paprika, black and white pepper, cayenne, thyme and basil — sings through the crust without overpowering the chicken. This preparation is special because it’s forgiving: if you’re a bit off on frying time, the marinade and seasoning help keep each bite flavorful. Serve it hot for the best textural contrast, and watch family and friends gather to dunk pieces in your favorite sauces.
Why You'll Love This Recipe
- Deeply seasoned crust with a perfect balance of warmth from paprika and cayenne and herbal notes from thyme and basil — familiar and comforting.
- Buttermilk-and-egg soak keeps the meat juicy while helping the double-dredge form a sturdy, flaky crust that stays crisp after resting.
- Uses common pantry staples: all-purpose flour, basic spices, eggs and buttermilk — no obscure ingredients needed.
- Make-ahead friendly: marinate the pieces for at least 2 hours or up to overnight for deeper flavor and easier day-of frying.
- Reasonable hands-on time: about 20 minutes active prep, with frying taking roughly 15–25 minutes depending on piece size, so you can plan around guests or sides.
- Crowd-pleasing and adaptable — works for family dinners, potlucks, or a casual party platter.
I’ve served this on picnic tables and holiday buffets; neighbors once showed up unexpectedly and left with an empty platter and requests for the recipe. It’s reliably the first dish to disappear because the crust’s texture and the gently spiced meat hit that comfort-food sweet spot. Over time I learned small adjustments — resting on a wire rack, using a thermometer for oil temperature, and maintaining a low simmer rather than a rolling boil — that made the difference between good and exceptional.
Ingredients
- Chicken (3 lb): Use a mix of thighs and drumsticks for even frying and juicy dark meat; if you prefer white meat, use bone-in breasts halved. Look for skin-on pieces for extra crispness.
- All-purpose flour (2 cups): The backbone of the crust — use unbleached flour for a cleaner flavor and better golden color. You can blend half plain flour and half rice flour if you want an extra-light crunch.
- Salt (2 tsp) & black pepper (1 1/2 tsp): Essential for seasoning the flour; use kosher salt for even distribution and freshly cracked pepper for more pronounced heat.
- Paprika (1 tbsp): Adds color and a sweet, smoky backbone; smoked paprika works too but start with a little less if you’re sensitive to smoke flavor.
- Garlic & onion powder (1 tsp each): Provide savory depth without moisture; use granulated garlic for a cleaner texture.
- Thyme & basil (1 tsp each): These dried herbs add the herbaceous notes that recall the classic blend; crush them between your fingers before mixing to release oils.
- White pepper (1/2 tsp) & cayenne (1/2 tsp): White pepper gives a subtle sharpness, while cayenne adds a controlled warmth — increase cayenne for more heat.
- Buttermilk (1 cup) & eggs (2): The wet soak tenderizes and helps the coating adhere; full-fat buttermilk gives the best texture and flavor.
- Vegetable oil: Use a neutral oil with a high smoke point like canola, peanut, or sunflower for frying; plan on 4–6 cups depending on pot size.
Instructions
Marinate the chicken: Whisk 1 cup buttermilk with 2 large eggs in a large bowl until smooth. Add the chicken pieces, turning to coat completely. Cover and refrigerate at least 2 hours or overnight for best tenderness and flavor penetration. The lactic acid in the buttermilk gently breaks down muscle fibers, keeping the interior moist during frying. Make the seasoned flour: In a shallow bowl or rimmed baking sheet, combine 2 cups all-purpose flour with 2 tsp salt, 1 1/2 tsp black pepper, 1 tbsp paprika, 1 tsp garlic powder, 1 tsp onion powder, 1 tsp dried thyme, 1 tsp dried basil, 1/2 tsp white pepper and 1/2 tsp cayenne. Whisk thoroughly to ensure the spices are evenly distributed — this prevents concentrated salty or spicy pockets in the crust. Double-dredge for maximum crunch: Remove a piece of chicken from the buttermilk, letting excess drip off, then dredge in the seasoned flour until coated. Return it briefly to the buttermilk, then dredge again in flour for a thicker, flakier crust. Place on a wire rack and repeat; letting coated pieces rest 10–15 minutes before frying helps the coating adhere and reduces flour fallout in the oil. Heat the oil and fry: Fill a heavy pot or deep fryer with enough oil to come halfway up the chicken, leaving room so the oil won’t bubble over. Heat to 350°F (use a thermometer). Carefully lower pieces into the oil in a single layer, don't overcrowd, and maintain temperature between 325–350°F. Fry 6–8 minutes per side for drumsticks and thighs (12–16 minutes total), adjusting time for larger pieces, until internal temperature reaches 165–170°F and crust is deep golden brown. Drain and rest: Transfer fried pieces to a wire rack set over a baking sheet to drain; rest 5–10 minutes so juices redistribute and the crust firms slightly. This prevents the bottom from steaming and losing crispness. Serve warm with your favorite sides.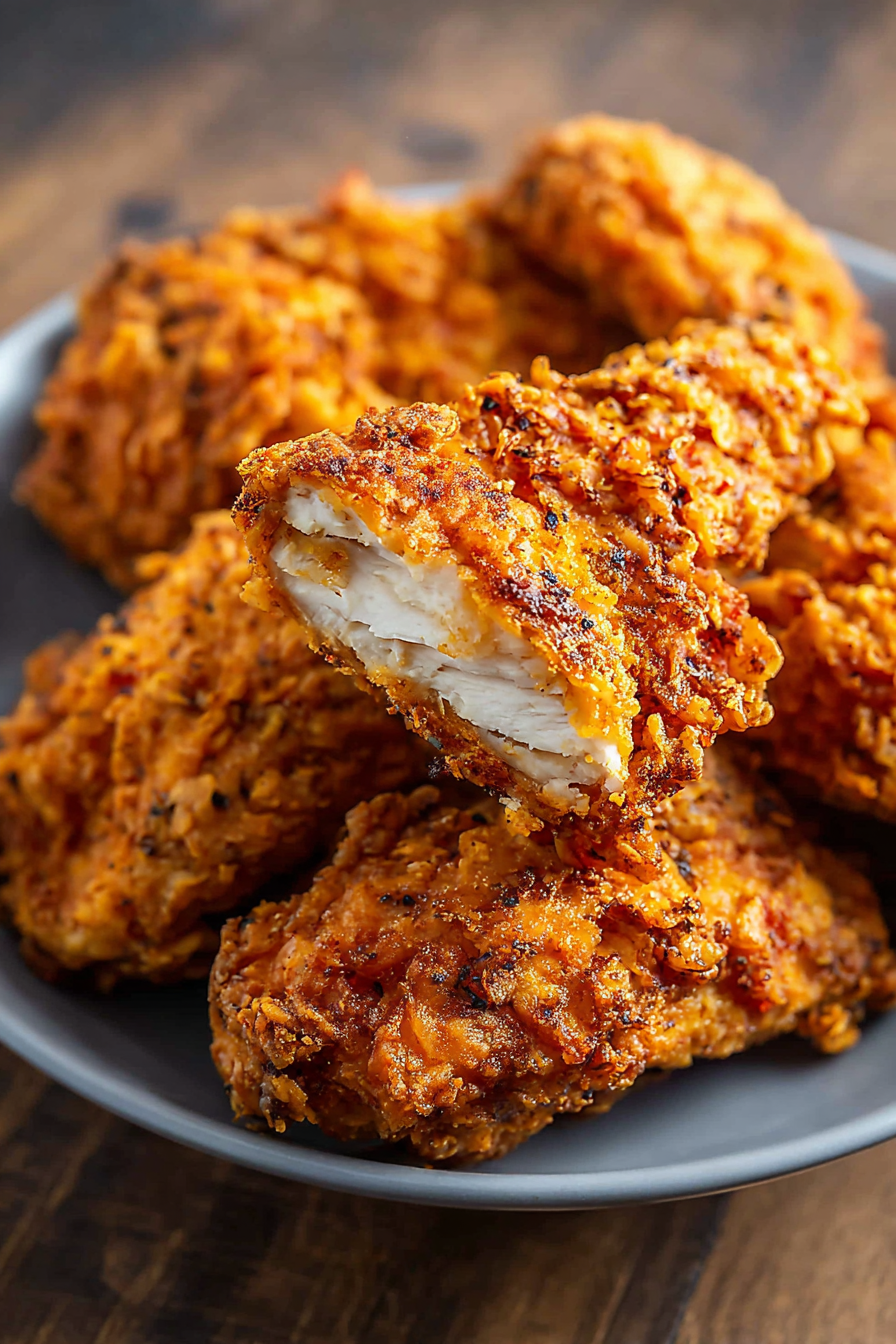
You Must Know
- The buttermilk soak both seasons and tenderizes; marinate at least 2 hours or overnight for best results.
- Maintain oil temperature inside a 325–350°F window; too cool yields greasy crust, too hot burns exterior before center cooks.
- Double-dredging creates a flaky, durable crust that holds up to dipping and reheating; resting on a rack preserves crispness.
- Fried pieces freeze well for up to 3 months; flash-freeze on a tray first, then transfer to a zip-top bag to avoid clumping.
- Always drain on a rack rather than paper towels to keep airflow and avoid soggy bottoms.
My favorite part of this method is that it scales. I’ve doubled the quantities for backyard gatherings and still ended up with consistently browned, juicy pieces by monitoring oil temperature and using a large enough pot. Family members often comment that the crust tastes layered — that’s the double-dredge at work. On one summer afternoon I made a batch for neighbors, and what started as casual sharing turned into a friendly trade of recipes and tips.
Storage Tips
Store cooled pieces in an airtight container in the refrigerator for up to 3 days. To reheat and revive the crust, place pieces on a wire rack set over a baking sheet and warm in a 375°F oven for 10–15 minutes until internal temperature reaches 165°F. For freezing, flash-freeze on a tray for 1–2 hours then transfer to a freezer bag; reheat from frozen in a 400°F oven for 20–25 minutes, checking temperature and covering loosely with foil if browning too fast.
Ingredient Substitutions
If you need a gluten-free version, substitute a 1:1 gluten-free flour blend or try half rice flour and half cornstarch for a crisp alternative; note texture will be slightly different. For dairy-free, swap the buttermilk for a mixture of 1 cup unsweetened almond or soy milk plus 1 tbsp lemon juice or white vinegar (let sit 5 minutes). To reduce heat, halve the cayenne. Adding 1–2 tbsp cornstarch to the flour mix increases crispness if you prefer an extra-crunchy shell.
Serving Suggestions
Serve alongside classic pairings: buttery mashed potatoes, coleslaw with a bright vinegar dressing, and honey biscuits. For a modern twist, offer pickled jalapeños, spicy honey, and a cooling herb yogurt dip. Garnish with a sprinkle of flaky sea salt and a few fresh thyme sprigs for aroma. This preparation works equally well for a picnic plate or a comforting dinner — plate with finger-food sides like corn on the cob and baked beans for a Southern-style spread.
Cultural Background
Fried chicken has deep roots across many culinary traditions, but the American-style, herb-forward crust became iconic through regional cooks and later commercial chains. The technique of marinating in buttermilk and double-dredging reflects Southern home-cooking methods intended to keep the interior moist while producing a robust crust. Over decades, variations have proliferated, with each cook adding their signature blend of spices and herbs that nod to family history and local tastes.
Seasonal Adaptations
In summer, lighten the meal with a crisp corn-and-tomato salad and grilled peaches for contrast. During cooler months, add warm sides like braised collard greens and smoky baked beans. The spice blend can also be adapted seasonally: add a pinch of cinnamon and nutmeg in fall for holiday flair, or swap in lemon zest and fresh herbs in spring to brighten the crust.
Meal Prep Tips
For an efficient meal-prep approach, marinate the chicken the night before and portion the flour mix into shallow containers for quick dredging. Fry only what you’ll eat that day and chill the remaining marinated pieces for frying later. Use an instant-read thermometer to speed up doneness checks and invest in a heavy pot and a reliable candy/deep-fry thermometer to keep oil temperature steady — these small investments save time and reduce stress on frying day.
With this approach you’ll have crunchy, flavorful pieces that rival takeout while offering the satisfaction of homemade food. Enjoy the process, and feel free to adapt spices and sides to make this your own — it’s the memories shared over the plate that make it truly special.
Pro Tips
Pat chicken dry before marinating if it was wet from packaging; this helps the buttermilk adhere evenly.
Rest dredged pieces on a wire rack for 10–15 minutes before frying to set the coating and reduce flour fallout.
Use a candy or deep-fry thermometer to keep oil temperature steady; small fluctuations affect final texture.
Fry in batches and don’t overcrowd the pot — overcrowding drops oil temperature and yields greasy crust.
If crust browns too quickly, lower heat slightly and finish cooking at a stable, lower temperature.
This nourishing kfc-style crispy fried chicken recipe is sure to be a staple in your kitchen. Enjoy every moist, high protein slice — it is perfect for breakfast or as a wholesome snack any time.
FAQs about Recipes
How long should I marinate the chicken?
Yes. Marinate for at least 2 hours; overnight gives deeper flavor and extra tenderness.
What oil temperature should I fry at?
Maintain oil between 325–350°F. Use an instant-read thermometer for accuracy and adjust heat to keep temperature steady.
How do I reheat leftovers without losing crispness?
Reheat in a 375°F oven on a wire rack for 10–15 minutes to revive crispness and reach 165°F internal temperature.
Tags
KFC-Style Crispy Fried Chicken
This KFC-Style Crispy Fried Chicken recipe makes perfectly juicy, tender, and flavorful steak every time! Serve with potatoes and a side salad for an unforgettable dinner in under 30 minutes.
Ingredients
Main
Dry Coating
Wet Mix
Frying
Instructions
Marinate the chicken
Whisk 1 cup buttermilk with 2 large eggs. Submerge chicken pieces in the mixture, cover, and refrigerate at least 2 hours or overnight for best tenderness.
Prepare seasoned flour
In a shallow bowl, combine 2 cups flour with all listed spices and herbs. Whisk until evenly mixed to ensure balanced seasoning in the crust.
Double-dredge
Dredge marinated chicken first in the seasoned flour, back into the buttermilk briefly, then again in flour. Rest coated pieces 10–15 minutes on a wire rack before frying.
Heat oil and fry
Heat oil in a heavy pot to 350°F. Fry pieces in batches, maintaining 325–350°F, about 6–8 minutes per side for thighs/drumsticks, until golden and internal temp reaches 165–170°F.
Drain and rest
Transfer fried pieces to a wire rack over a baking sheet to drain. Rest 5–10 minutes so juices redistribute and crust firms. Serve warm.
Last Step: Please leave a rating and comment letting us know how you liked this recipe! This helps our business to thrive and continue providing free, high-quality recipes for you.
Nutrition
Did You Make This?
Leave a comment & rating below or tag
@aiolirecipe on social media!
Categories:
You might also like...

Fall Harvest Pasta Salad
A cozy, colorful salad that celebrates autumn flavors — roasted butternut squash and Brussels sprouts tossed with pasta, cranberries, pecans, and tangy feta, finished with a balsamic vinaigrette.

Cilantro Lime Steak Bowls
Bright, tangy cilantro-lime marinated flank steak served over rice with black beans, corn, fresh veggies and creamy avocado for a fast, healthy weeknight bowl.

Pecan Pie Crescent Rolls
Buttery crescent rolls filled with a sweet pecan pie–inspired filling — a quick, crowd-pleasing dessert perfect for holidays or weeknight cravings.
Did You Make This?
Leave a comment & rating below or tag @aiolirecipe on social media!
Rate This Recipe
Share This Recipe
Enjoyed this recipe? Share it with friends and family, and don't forget to leave a review!
Comments (1)
This recipe looks amazing! Can't wait to try it.
Comments are stored locally in your browser. Server comments are displayed alongside your local comments.
Hi, I'm Olivia!
What's Popular

30-Minute Meals!
Join to receive our email series which contains a round-up of some of our quick and easy family favorite recipes.