
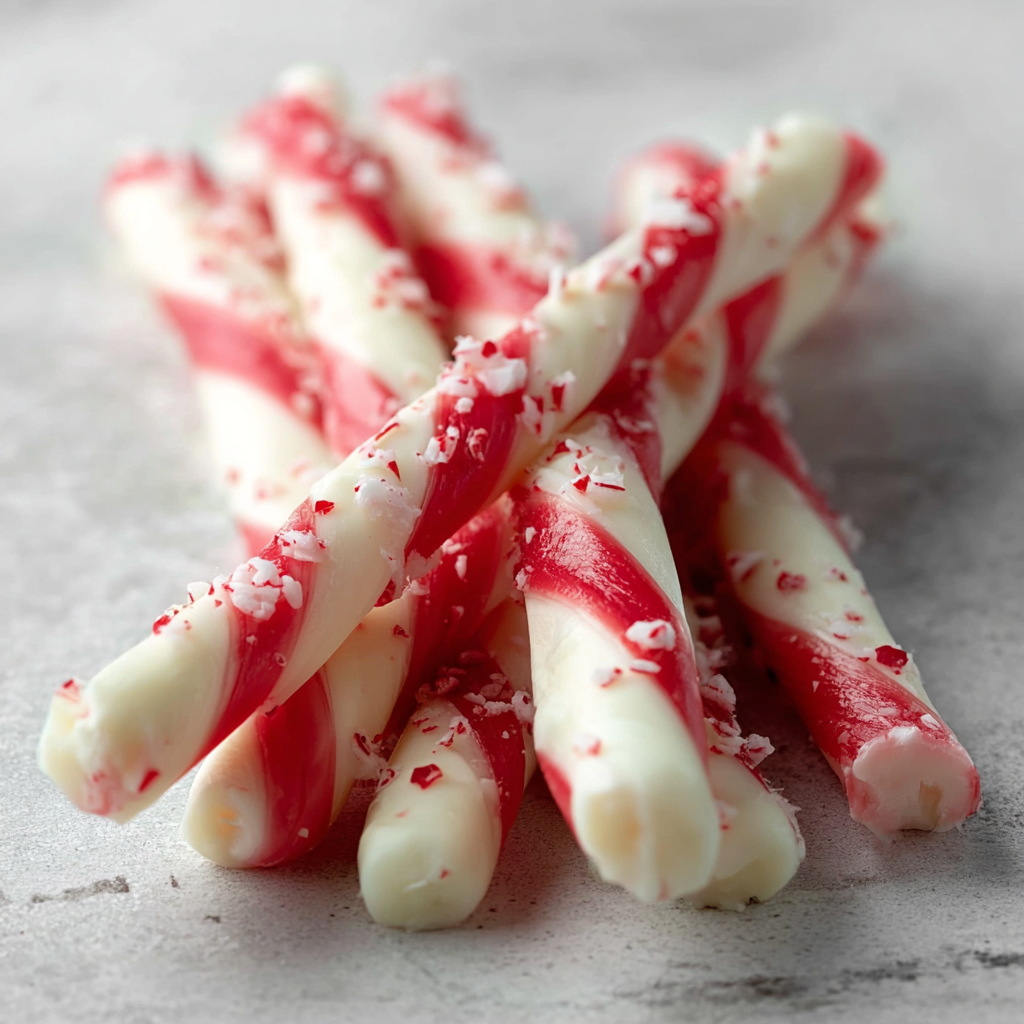
Homemade Christmas Peppermint Sticks

Crisp, minty white chocolate sweets studded with crushed candy cane — a simple, nostalgic holiday treat you can make in under an hour.
This recipe for homemade Christmas peppermint sticks is one of those small seasonal pleasures that turns an ordinary afternoon into a festive memory. I first made these on a snowy December afternoon years ago when I wanted a gift to tuck into neighbors' mailboxes. The combination of creamy white chocolate and bright, crunchy candy cane pieces felt like childhood all over again. These sticks are simple enough to make with kids, yet elegant enough to serve with coffee or after a holiday meal.
What makes this version special is the attention to melting and cooling technique. Melting white chocolate slowly and stirring frequently prevents graininess and ensures a glossy finish. I learned that adding crushed candy canes gradually keeps the shards from sinking and gives every stick a nice distribution of peppermint. The finished pieces snap satisfyingly and have a delicate, cooling peppermint flavor that pairs perfectly with the sweetness of white chocolate.
Why You'll Love This Recipe
- Quick and festive: ready in about 60 minutes including cooling time, ideal when you need last-minute edible gifts.
- Minimal ingredients: uses only three pantry-friendly items—white chocolate, candy canes, and peppermint extract—so it’s easy to make anytime.
- Kid-friendly and giftable: a fun activity to do with children and simple to package in cellophane bags for neighbors or coworkers.
- Customizable texture: add more or fewer candy cane pieces to vary the crunch and color speckles in each stick.
- Make-ahead friendly: keeps well in the freezer or fridge and travels easily without melting when wrapped properly.
My family loved how these bright minty bites disappeared within a day the first time I made them. One neighbor told me she used them stirred into hot cocoa, which is a delightful idea I now adopt every winter.
Ingredients
- 12 candy canes (crushed): Use standard single-serving candy canes. I recommend plain peppermint rather than flavored varieties so the mint comes through cleanly. Crush them in a sealed plastic bag with a rolling pin until you have a mix of small granules and tiny shards for texture.
- 1 teaspoon peppermint extract: Choose a pure peppermint extract rather than an oil-based flavoring for the most natural, brisk mint flavor. Start with 1 teaspoon; if you prefer a stronger punch, you can increase to 1 1/2 teaspoons but add cautiously.
- 12 ounces white chocolate: High-quality bars or chips (for example Ghirardelli or another couverture-style brand) melt more smoothly and taste less waxy. Twelve ounces yields roughly a dozen sticks in a standard ice cube tray. Chop bars into uniform pieces if using blocks so they melt evenly.
Instructions
Step 1 - Prep the candy canes:Place all candy canes into a freezer-safe plastic bag and seal. Use a rolling pin, meat tenderizer, or the blunt side of a heavy pan to crush them into a mix of fine granules and small shards. Aim for mostly small pieces with a few larger bits for crunch. Keep about 1/2 cup set aside for sprinkling on top later if you like a decorative finish. Crushing in a bag contains the mess and prevents sugar dust from coating your counters.Step 2 - Set up your melting station:Use a double boiler or a heatproof bowl set over a pot of gently simmering water. Keep the water at a low simmer and ensure the bowl does not touch the water. Chop or use small pieces of white chocolate so it melts quickly and evenly. Stir constantly with a silicone spatula and remove from heat when the chocolate reaches a smooth, pourable consistency. If the chocolate seems too thick, add 1 teaspoon of neutral oil (like vegetable oil) to loosen it slightly.Step 3 - Flavor and fold:Once the white chocolate is fully melted and smooth, stir in the teaspoon of peppermint extract. Add crushed candy cane gradually, about 1/2 cup at a time, folding gently so pieces remain distributed rather than sinking. Taste a tiny dab (cooled) to check balance; add up to another 1/2 teaspoon of extract only if needed. Work quickly: white chocolate will begin to thicken as it cools.Step 4 - Fill the molds:Place a standard ice cube tray or small silicone molds on a flat baking sheet. Carefully spoon or pour the mixture into each cavity, dividing evenly so each stick is similar in size. If you reserved extra candy cane pieces, press a few on top of each filled cavity for a pretty, crunchy finish. Tap the tray gently on the counter once to remove air bubbles and level the tops.Step 5 - Chill and unmold:Transfer the tray to the freezer for about 45 to 60 minutes until completely set and firm to the touch. To unmold, let the tray sit at room temperature 2 to 3 minutes to loosen slightly, then invert and gently press each cavity to release the peppermint sticks. Store in an airtight container in the refrigerator for up to two weeks or freeze for longer storage. Allow frozen sticks to sit at room temperature a few minutes before serving so they are not overly hard.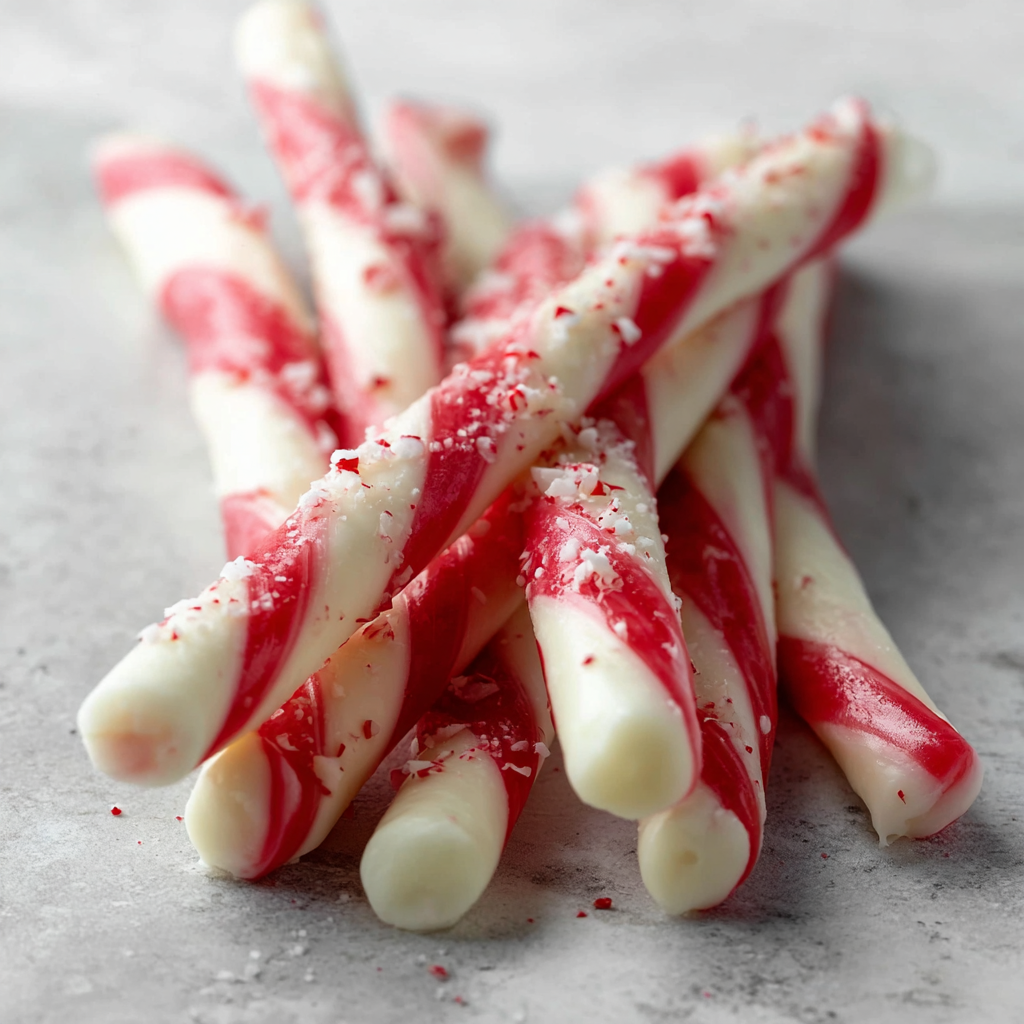
You Must Know
- Contains dairy and sugar: this is not suitable for dairy-free or very low-sugar diets. White chocolate is the main source of milk solids and fat.
- Storage: refrigerate in an airtight container for up to two weeks, or freeze for up to three months; thaw in the refrigerator to avoid condensation.
- Portioning: this recipe yields about 12 peppermint sticks when using a standard 12-cavity ice cube tray. Adjust quantities proportionally for more portions.
- Texture tip: do not overheat the white chocolate. Keep the heat low and remove from the double boiler while a few unmelted pieces remain; residual warmth will finish melting them.
My favorite part is the snap and the cool peppermint finish that lingers on the tongue. A college roommate once crushed candy canes into coffee, and this brought that same bright flash of flavor—except in a neat, hand-held form. Watching the kids press the shards into the tops is my favorite memory; their concentration and delight felt like magic.
Storage Tips
Store the sticks in a single layer in an airtight container separated with parchment or wax paper to prevent sticking. Keep them refrigerated if you plan to eat them within two weeks. For gift-giving or long-term storage, freeze in freezer-safe boxes with parchment between layers; they last up to three months. When you're ready to use frozen sticks, move them to the refrigerator for an hour before bringing them to room temperature to avoid condensation forming on the surface.

Ingredient Substitutions
For a darker contrast, substitute semisweet or milk chocolate but add peppermint extract sparingly because intensities differ. If you need dairy-free options, use a high-quality vegan white chocolate made from cocoa butter and plant-based milk; note texture and sweetness may change. To reduce sweetness, cut white chocolate with 2 ounces of unsweetened baking chocolate, though the mixture will become less glossy and more firm. If candy canes are unavailable, use crushed peppermint candies or peppermint bark pieces as a direct swap.
Serving Suggestions
Serve these peppermint sticks alongside coffee, espresso, or hot chocolate as a festive stir-in or nibble. They also make charming additions to dessert platters or after-dinner mints. Arrange a few sticks in small cellophane bags tied with ribbon for neighbor gifts, or place single sticks at each holiday place setting for a sweet finishing touch. Pair with shortbread cookies or a simple chocolate torte to balance the bright mint.
Cultural Background
Peppermint confections are a long-standing winter tradition in many Western countries, often tied to Christmas celebrations. Candy canes originally had simple shapes and were white; the red stripes and peppermint flavor evolved later as candy makers experimented. Combining peppermint with white chocolate is a modern twist that emphasizes the cooling, clean mint flavor against a creamy base, creating a balance popular in seasonal desserts and beverage garnishes.
Seasonal Adaptations
In winter, add a pinch of ground ginger to the chocolate for a warm-spicy undertone. For Valentine’s Day, use heart-shaped silicone molds and substitute a drop of raspberry extract along with peppermint for a fruity counterpoint. During summer, decorative sprinkles or chopped freeze-dried strawberries mixed into chilled white chocolate create lighter, colorful treats.
Meal Prep Tips
Make multiple batches and freeze flat in parchment between layers for quick hostess gifts through the season. Portion into small tins or boxes the night before an event so you have ready-made favors. Label containers with date and flavor notes, especially if you experiment with variations like dark chocolate or added nuts. For best taste, thaw refrigerated sticks 10 minutes before serving for optimal texture and flavor release.
These peppermint sticks are a simple seasonal joy that I hope will become part of your holiday traditions. They are easy to personalize and generous to share—try them once and you will find plenty of reasons to make another batch.
Pro Tips
Chop white chocolate into uniform pieces so it melts evenly and avoid overheating.
Reserve a small handful of crushed candy cane to press on top for a decorative finish.
If white chocolate thickens, stir in 1 teaspoon of neutral oil to loosen it slightly.
Work quickly when folding candy cane into melted chocolate to prevent pieces from sinking.
This nourishing homemade christmas peppermint sticks recipe is sure to be a staple in your kitchen. Enjoy every moist, high protein slice — it is perfect for breakfast or as a wholesome snack any time.
FAQs about Recipes
How long do peppermint sticks keep?
Store in an airtight container in the refrigerator for up to two weeks or freeze for up to three months.
Can I melt the white chocolate in the microwave?
Yes. Use a heatproof bowl over simmering water or a double boiler. Melt slowly and stir constantly.
Tags
Homemade Christmas Peppermint Sticks
This Homemade Christmas Peppermint Sticks recipe makes perfectly juicy, tender, and flavorful steak every time! Serve with potatoes and a side salad for an unforgettable dinner in under 30 minutes.
Ingredients
Main
Instructions
Prep the Candy Canes
Place candy canes in a sealed freezer bag and crush with a rolling pin until most pieces are small with a few larger shards for crunch. Reserve some pieces for topping.
Melt the White Chocolate
Set a heatproof bowl over simmering water (double boiler) and melt chopped white chocolate on low heat, stirring frequently until smooth and pourable. Do not overheat.
Combine Candy Canes and Chocolate
Remove bowl from heat. Stir in 1 teaspoon peppermint extract, then fold crushed candy canes in gradually so shards stay suspended throughout the chocolate.
Pour Into Molds
Spoon or pour the mixture evenly into a 12-cavity ice cube tray or silicone molds. Press extra candy cane pieces on top for decoration and tap to level.
Freeze and Unmold
Freeze for 45 to 60 minutes until firm. Let sit a few minutes at room temperature before inverting tray and releasing sticks. Store chilled or frozen.
Last Step: Please leave a rating and comment letting us know how you liked this recipe! This helps our business to thrive and continue providing free, high-quality recipes for you.
Nutrition
Did You Make This?
Leave a comment & rating below or tag
@aiolirecipe on social media!
Categories:
You might also like...

Fall Harvest Pasta Salad
A cozy, colorful salad that celebrates autumn flavors — roasted butternut squash and Brussels sprouts tossed with pasta, cranberries, pecans, and tangy feta, finished with a balsamic vinaigrette.

Cilantro Lime Steak Bowls
Bright, tangy cilantro-lime marinated flank steak served over rice with black beans, corn, fresh veggies and creamy avocado for a fast, healthy weeknight bowl.

Pecan Pie Crescent Rolls
Buttery crescent rolls filled with a sweet pecan pie–inspired filling — a quick, crowd-pleasing dessert perfect for holidays or weeknight cravings.
Did You Make This?
Leave a comment & rating below or tag @aiolirecipe on social media!
Rate This Recipe
Share This Recipe
Enjoyed this recipe? Share it with friends and family, and don't forget to leave a review!
Comments (1)
This recipe looks amazing! Can't wait to try it.
Comments are stored locally in your browser. Server comments are displayed alongside your local comments.
Hi, I'm Olivia!
What's Popular

30-Minute Meals!
Join to receive our email series which contains a round-up of some of our quick and easy family favorite recipes.