
Gnome Mini Cheesecakes

Tiny, whimsical cheesecakes topped with strawberries and whipped cream—perfect for parties, holidays, and cozy afternoons.
This little dessert became a holiday tradition the first winter I tried to make something festive without fuss. I wanted a sweet that looked special but not fussy, and the idea of tiny cheesecakes with strawberry hats came while arranging produce at the market. The sweetness of the strawberry, the creamy tang of the filling and the buttery graham base combine into a bite that always makes friends smile. They’re playful, quick to assemble, and feel like a tiny celebration on a plate. I first served these at a small family brunch and the kids declared them "gnome hats," a name that stuck.
I often reach for this recipe when I want something impressive with minimal work. The texture is smooth and dense but still tender — not heavy like a full-sized cheesecake, yet rich enough to feel indulgent. The crust adds a nutty crunch and the whipped cream gives a cloud-like finish. These are ideal for gift boxes, potlucks, or an easy dessert when you’re short on oven time. Because they’re individual portions, plating is fun and everyone gets the same perfect size. I’ll walk you through thoughtful techniques so your little cheesecakes stay tall, smooth, and absolutely adorable.
Why You'll Love This Recipe
- Fast to assemble and bakes in a single sheet pan—ready in about 45 minutes from start to finish, making them ideal for last-minute gatherings.
- Uses pantry staples: graham cracker crumbs, butter, cream cheese, and eggs — no specialty ingredients required.
- Individually portioned so you don’t have to slice a whole cake; they’re perfect for parties, boxed gifts, or just a treat for the week.
- Adaptable decorations: swap strawberries for raspberries or use a piped swirl of flavored whipped cream for variety.
- Make-ahead friendly: bake and chill the minis a day ahead, and finish with fresh berries just before serving for the best texture and presentation.
When I first tested these, my neighbor dropped by and declared them the most charming dessert she’d seen in years. Our family table lit up instantly — my niece stacked a few on top of each other like tiny towers. They’re playful and reliably delicious, and I love how easy they are to scale up when you need to feed a crowd.
Ingredients
- Graham cracker crumbs (1 cup): Use full-flavor graham crackers for the best aroma; serve as the crunchy counterpoint to the creamy center. If buying pre-crumbed, check for even texture. Brands like Nabisco or store-brand graham crackers both work well.
- Melted butter (3 tablespoons): Unsalted is preferable so you control seasoning. Melt gently and cool slightly before mixing so it doesn’t liquefy the sugar too much.
- Granulated sugar (2 tablespoons + 1/2 cup): The 2 tablespoons sweeten the crust while the 1/2 cup sweetens the filling. Caster sugar works smoothly, but standard granulated is perfectly fine.
- Cream cheese (16 oz / 2 blocks): Bring to room temperature and use full-fat cream cheese for the creamiest texture. Brands like Philadelphia give a reliably smooth result.
- Vanilla extract (1 teaspoon): Pure vanilla enhances flavor complexity. If using imitation, add a touch less as it can be more intense.
- Eggs (2 large): Room-temperature eggs incorporate more evenly and help achieve a silkier set.
- Sour cream or Greek yogurt (1/4 cup): Adds tang and lightens the texture; full-fat Greek yogurt is a great swap for a slightly brighter flavor.
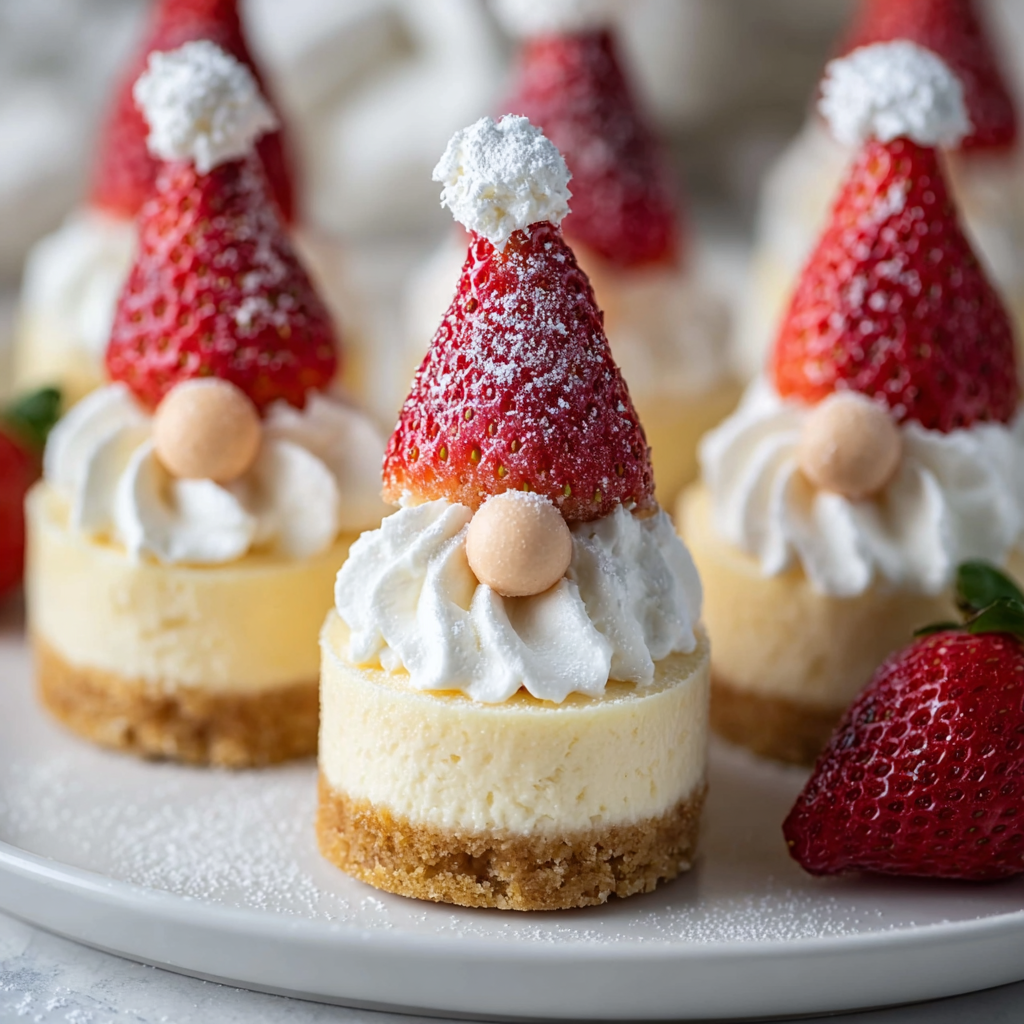
- Fresh strawberries (12): Choose ripe, firm berries for tops — they become the gnome "hat." Look for deep red color and a glossy sheen.
- Whipped cream: Use stabilised homemade whipped cream or a quality store-bought version if assembling far in advance.
- Mini white chocolate chips or candy pearls: Small, round pieces for the noses — their size matters, so choose miniature varieties for proportion.
- Powdered sugar (for dusting): A light dusting adds a magical, snowy finish.
Instructions
Prepare the pan and crust: Preheat the oven to 325°F (160°C). Line a 12-cup muffin tin with paper liners or use silicone molds. In a bowl, combine 1 cup graham cracker crumbs, 3 tablespoons melted butter, and 2 tablespoons granulated sugar. Press about 1 to 1 1/2 tablespoons of the crumb mix firmly into the base of each liner to form an even, compact crust. Chill in the fridge while you make the filling to help the crust set. Make the filling: In a large bowl, beat 16 oz softened cream cheese with 1/2 cup granulated sugar until smooth and free of lumps—scrape the sides often. Beat in 1 teaspoon vanilla. Add eggs one at a time, mixing gently until incorporated; overbeating introduces air and can cause cracks. Fold in 1/4 cup sour cream or Greek yogurt just until combined for a silkier texture. Fill and bake: Divide the filling evenly among the prepared cups, filling to about 3/4 full. Tap the pan gently on the counter to release air bubbles. Bake at 325°F for 15 to 18 minutes—centers should still have a slight wobble like gelatin. Avoid overbaking; a firm edge with a soft center ensures a creamy finish. Cool and chill: Cool the tins on a rack for 20 minutes at room temperature, then transfer to the refrigerator for a minimum of 2 hours, preferably 4, to set fully. Chilling overnight makes clean slicing and neater toppings easier. If you see tiny cracks, a quick whipped cream cover will hide them. Decorate and serve: Before serving, top each mini with a dollop of whipped cream, place a strawberry inverted onto the cream to resemble a hat, and press a mini white chocolate chip or candy pearl for the nose at the base of the berry. Lightly dust with powdered sugar. Serve cold for the best texture and flavor contrast.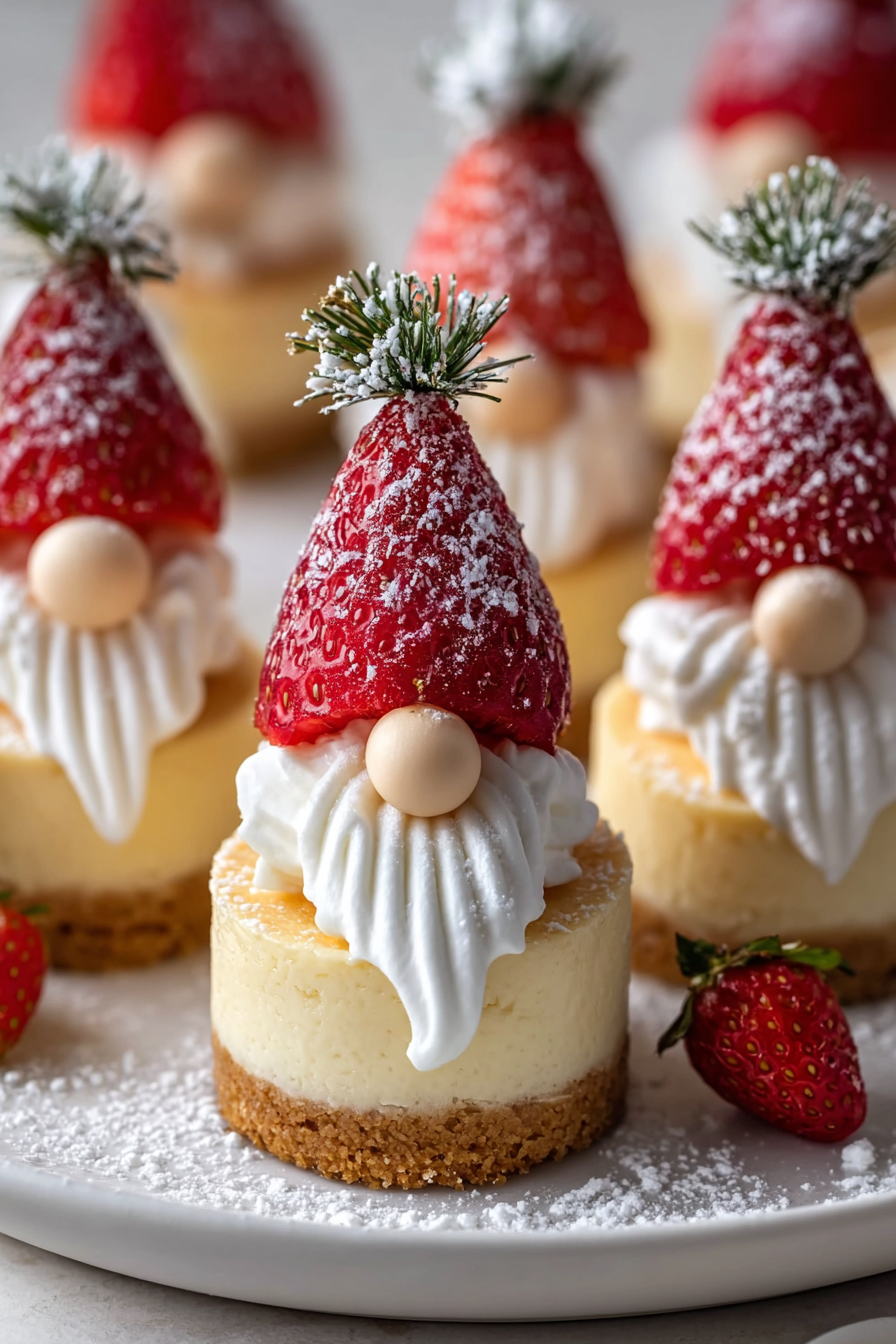
You Must Know
- These freeze well for up to 3 months if you wrap each mini tightly in plastic and place in an airtight container—defrost in the refrigerator overnight before decorating.
- High in calcium and rich in fat from the cream cheese; a single mini is an indulgence at roughly 250 calories depending on toppings.
- Best made with full-fat cream cheese for proper texture; low-fat versions often yield a runny or grainy set.
- Allow the filling to cool gradually to avoid sudden temperature shifts that can cause cracking.
My favorite thing about these is how forgiving they are. I once forgot to chill the crust and the filling still set beautifully after extra fridge time. The kids loved arranging the berries like hats, and the adult guests appreciated the sophisticated tang. They’re small, but they make a big impression—perfect for celebrations or a special afternoon tea.
Storage Tips
Store finished cheesecakes in an airtight container in the refrigerator for up to 4 days. If you plan to assemble the bases and bake ahead, keep them chilled and add strawberries and whipped cream just before serving to preserve freshness. For longer storage, freeze undecorated minis on a tray until firm, then wrap individually and transfer to a freezer-safe bag for up to 3 months. Thaw slowly in the refrigerator to maintain texture; avoid microwaving as it can separate the filling.
Ingredient Substitutions
If you prefer a brighter tang, substitute the 1/4 cup sour cream with full-fat Greek yogurt; the texture will be virtually identical with a slightly fresher flavor. For a gluten-free version, swap graham crumbs for a gluten-free cookie crumb or crushed almond flour mixed with a tablespoon of sugar—note that almond flour will yield a denser, nuttier crust. To make them dairy-free, use a vegan cream cheese and coconut-based yogurt, though texture and flavor will differ and may be slightly softer.
Serving Suggestions
Arrange minis on a slate or white platter with a light dusting of powdered sugar for contrast. Serve alongside espresso or a floral tea like chamomile. For brunch, pair with lemony fruit salads and savory quiches; for dessert, present them with a drizzle of reduced strawberry syrup or a small spoonful of berry compote. Garnish with tiny mint leaves for color and a hint of brightness.
Cultural Background
Individual cheesecakes echo the classic New York-style dessert scaled down into single portions — an approach popularized by modern pastry chefs who favor individualized service. The graham cracker crust is a staple of American no-bake and baked cheesecakes; combining it with delicate whipped toppings draws on European trends for elegant plating. The playful "gnome" decoration is a recent, whimsical adaptation often seen in home baking communities during winter holidays.
Seasonal Adaptations
In spring, swap strawberries for halved raspberries or a sliver of rhubarb compote for a tart contrast. In fall, warm the crust with a pinch of cinnamon and top with caramelized apple slices. For winter festivities, use candied cranberries and a dusting of extra powdered sugar to mimic snow. Adjust spices or toppings to fit the season while keeping the core method intact.
Meal Prep Tips
Prepare crusts and filling the day before: bake the minis, chill overnight, and store undecorated in the fridge. Portion whipped cream into a piping bag and keep chilled until serving. If transporting, freeze on a tray then pack in a cooler to keep firm; they’ll defrost gently en route. Use sturdy liners or silicone cups for easy removal during catering events.
These tiny desserts are deceptively simple and endlessly adaptable. They bring joy at the table and are forgiving for cooks of all levels. Give them a try and make them your own—the little details like the nose or a tiny mint leaf will make guests smile every time.
Pro Tips
Bring cream cheese and eggs to room temperature before mixing to ensure a smooth, lump-free filling.
Avoid overmixing once eggs are added to prevent excess air and cracking during baking.
Chill crusts briefly before adding filling to help them set and maintain structure.
This nourishing gnome mini cheesecakes recipe is sure to be a staple in your kitchen. Enjoy every moist, high protein slice — it is perfect for breakfast or as a wholesome snack any time.
FAQs about Recipes
Can I substitute sour cream with Greek yogurt?
Yes — you can use full-fat Greek yogurt instead of sour cream for a slightly tangier flavor and similar texture.
How long can I freeze these?
Freeze undecorated minis on a tray until firm, then wrap individually and store in an airtight container for up to 3 months. Thaw in the refrigerator.
Tags
Gnome Mini Cheesecakes
This Gnome Mini Cheesecakes recipe makes perfectly juicy, tender, and flavorful steak every time! Serve with potatoes and a side salad for an unforgettable dinner in under 30 minutes.
Ingredients
Crust
Filling
Decoration
Instructions
Prepare the pan and crust
Preheat oven to 325°F. Line a 12-cup muffin tin with liners. Combine graham crumbs, melted butter and 2 tablespoons sugar; press 1 to 1 1/2 tablespoons into each cup. Chill while making filling.
Make the filling
Beat room-temperature cream cheese with 1/2 cup sugar until smooth. Add vanilla and eggs one at a time, mixing gently. Fold in sour cream or Greek yogurt until just combined.
Fill and bake
Divide filling among cups, filling to about 3/4 full. Tap to release air. Bake 15–18 minutes until centers slightly wobble. Avoid overbaking to prevent cracks.
Cool and chill
Cool on a rack 20 minutes, then refrigerate 2–4 hours or overnight to set. Chilling improves texture and makes decorating easier.
Decorate and serve
Top each mini with whipped cream, invert a strawberry as a hat, press a mini chip or candy for the nose, and dust lightly with powdered sugar before serving.
Last Step: Please leave a rating and comment letting us know how you liked this recipe! This helps our business to thrive and continue providing free, high-quality recipes for you.
Nutrition
Did You Make This?
Leave a comment & rating below or tag
@aiolirecipe on social media!
Categories:
You might also like...

Fall Harvest Pasta Salad
A cozy, colorful salad that celebrates autumn flavors — roasted butternut squash and Brussels sprouts tossed with pasta, cranberries, pecans, and tangy feta, finished with a balsamic vinaigrette.

Cilantro Lime Steak Bowls
Bright, tangy cilantro-lime marinated flank steak served over rice with black beans, corn, fresh veggies and creamy avocado for a fast, healthy weeknight bowl.

Pecan Pie Crescent Rolls
Buttery crescent rolls filled with a sweet pecan pie–inspired filling — a quick, crowd-pleasing dessert perfect for holidays or weeknight cravings.
Did You Make This?
Leave a comment & rating below or tag @aiolirecipe on social media!
Rate This Recipe
Share This Recipe
Enjoyed this recipe? Share it with friends and family, and don't forget to leave a review!
Comments (1)
This recipe looks amazing! Can't wait to try it.
Comments are stored locally in your browser. Server comments are displayed alongside your local comments.
Hi, I'm Olivia!
What's Popular

30-Minute Meals!
Join to receive our email series which contains a round-up of some of our quick and easy family favorite recipes.