
Candy Cane Pizza Bread Sticks

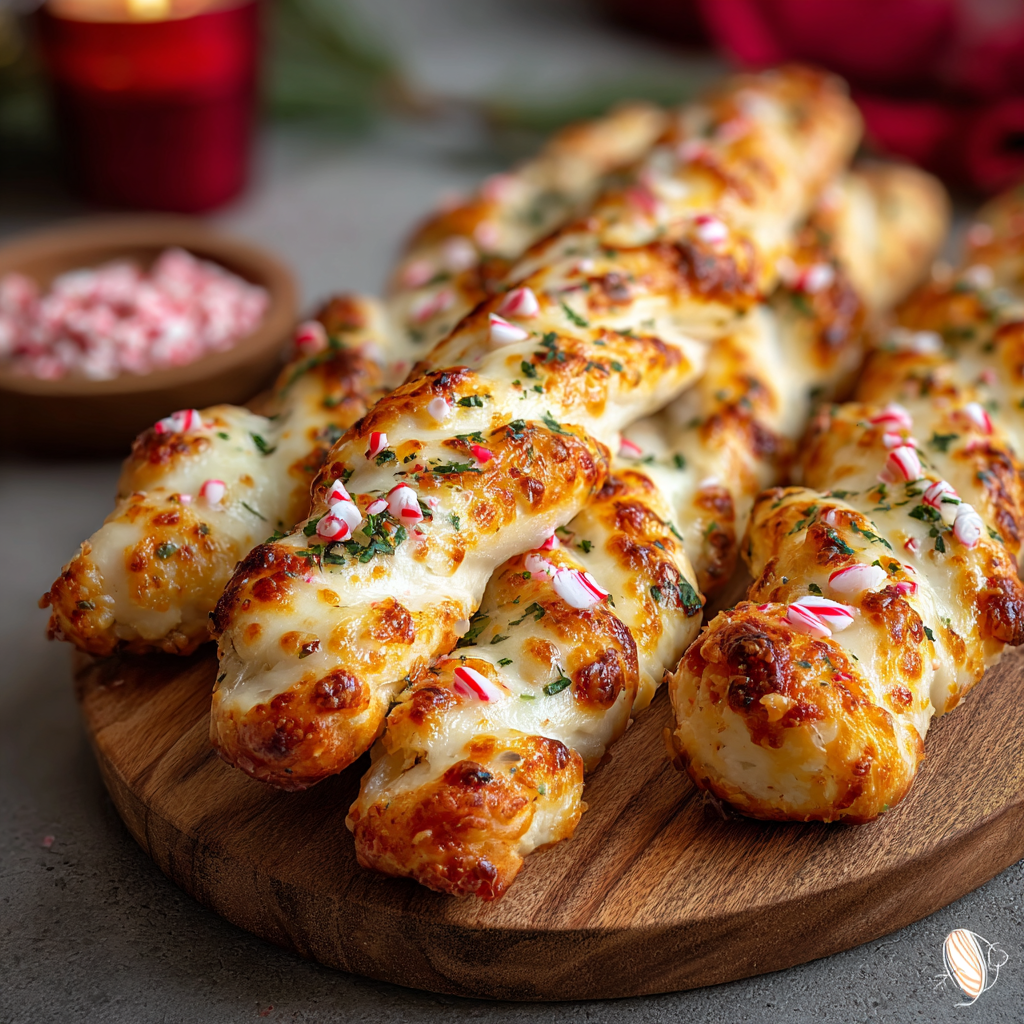
Festive candy cane shaped pizza bread sticks with melty mozzarella, zesty marinara, and a crisp golden crust. A quick holiday friendly snack made from refrigerated dough.

This recipe for Candy Cane Pizza Bread Sticks began as a playful idea the year I wanted an easy holiday nibble that looked festive without a lot of fuss. I first tried the shape at a small family gathering after finding a can of refrigerated pizza dough at the back of my fridge and a jar of thick marinara on the counter. The contrast of warm bubbly mozzarella and the crisp exterior of the dough made everyone smile, and the candy cane hook made the plate disappear faster than any other appetizer that night.
What makes these sticks special is their simplicity and the way common pantry items transform into something celebratory. The dough browns beautifully at 425 degrees F while the cheese melts without turning greasy when you use a compact layer of whole milk mozzarella. These are perfect for casual holiday hosting, a kids party, or as a playful side with soup. The shaping is forgiving so even first time bakers can get impressive results with very little extra effort.
Why You'll Love This Recipe
- Fast and approachable Ready in about 30 minutes from start to finish making it ideal for last minute entertaining.
- Uses pantry staples Refrigerated pizza dough and jarred marinara keep the ingredient list short and accessible.
- Festival friendly The candy cane silhouette adds holiday charm with no advanced skills required.
- Make ahead options You can assemble and refrigerate or freeze before baking to streamline service on the day of your event.
- Crowd pleasing warm, cheesy interior with a crisp exterior appeals to both kids and adults and pairs with many dips.
- Customizable Swap cheeses or herbs to match dietary needs or flavor preferences.
When I served these at my last holiday brunch the youngest guest insisted on the tiger striped presentation and the oldest guest asked for the recipe twice. Small adaptations like using Rao's marinara for a sturdy sauce or whole milk mozzarella for creaminess made a big difference in texture and flavor. I now keep the can of dough on hand during winter months specifically for this treat.
Ingredients
- Refrigerated pizza dough: One 13.8 ounce can such as Pillsbury, room temperature. Letting it relax keeps the dough tender and makes shaping easier.
- Marinara sauce: 1/2 cup of a thick variety such as Rao's. A dense sauce prevents soggy edges and stands up to baking heat.
- Shredded mozzarella cheese: 1 cup of whole milk mozzarella for the creamiest melt. Pre shred or buy freshly shredded and blot any excess moisture to prevent oiliness.
- Dried oregano: 1/2 teaspoon for herbal warmth. If you prefer fresh herbs use a few leaves of chopped fresh basil as a garnish.
- Olive oil: 1 tablespoon extra virgin for brushing. This encourages deep golden color and adds a silky finish.
- Fresh thyme or basil: A few sprigs optional for garnish and aroma. Fresh leaves add brightness just before serving.
Instructions
Preheat and rest dough:Preheat the oven to 425 degrees F and line a baking sheet with parchment paper. Remove the dough from the can and let it sit at room temperature for about 10 minutes so it relaxes and resists shrinking when you shape it.Shape base rectangle:On a lightly floured surface unroll and press the dough into a roughly 10 by 8 inch rectangle. Work gently to avoid overworking the gluten which can make the texture tough. Use your fingertips to press rather than a rolling pin for a more forgiving, pillowy result.Top with sauce and cheese:Spoon 1/2 cup marinara into the center and spread thinly leaving a 1/2 inch border. Sprinkle 1 cup shredded mozzarella evenly over the sauce. A thin even layer melts reliably and avoids greasy puddles at the edges.Cut and twist:Slice the rectangle into 8 lengthwise strips. Pair two strips placed side by side press the ends together and twist into a spiral. Curve the top to form a candy cane hook and press the tail end to seal. Work quickly so the dough remains pliable.Brush and season:Arrange the sticks on the prepared sheet leaving space for expansion. Lightly brush each with 1 tablespoon olive oil and sprinkle with 1/2 teaspoon dried oregano distributed across the batch. The oil promotes even browning and the oregano offers aromatic contrast.Bake and rest:Bake at 425 degrees F for 10 to 14 minutes until the crust is golden and the cheese is bubbly and just starting to brown. Remove and let rest 3 to 5 minutes to set the cheese. Garnish with fresh thyme or basil and serve warm.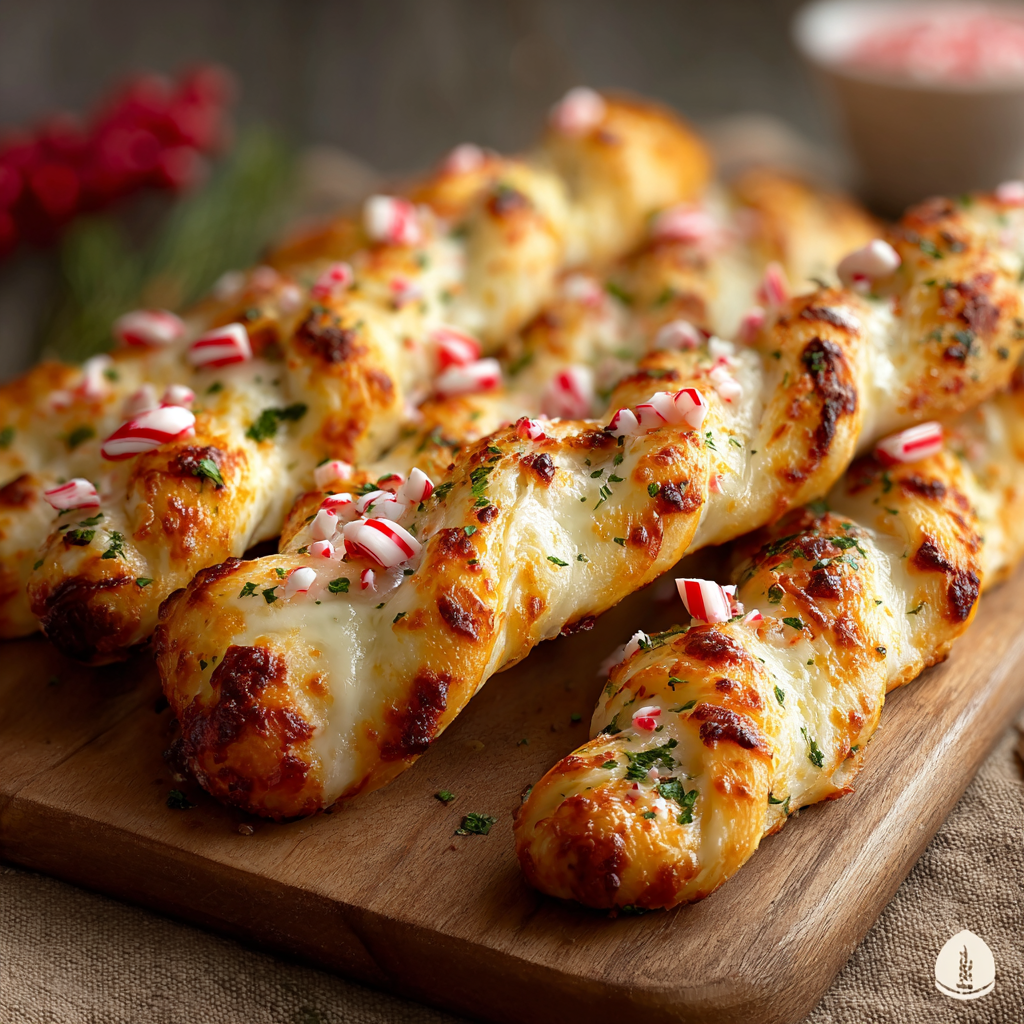
You Must Know
- These sticks are not gluten free since they use refrigerated wheat dough and they contain dairy from the cheese.
- You can assemble ahead and refrigerate unbaked for up to 24 hours or freeze unbaked for up to 1 month wrapped tightly.
- Reheat baked sticks in a 350 degrees F oven for 6 to 8 minutes to restore crispness rather than microwaving which makes them soft.
- Watch the cheese as it melts Look for a gentle bubbling and a light golden hint to know the interior is hot without overbrowning the crust.
- Serve with extra marinara warmed for dipping and a sprinkle of fresh herbs for brightness.
My favorite aspect is how a simple shape turns ordinary dough into something whimsical. Family members have requested these shaped sticks as part of holiday spreads and the simple presentation fits right into themed gatherings. The most memorable moment was when a small child insisted on wearing a candy cane hat while reaching for the last warm stick which is the sort of silly joy that keeps me making them year after year.
Storage Tips
To store leftover sticks cool them completely then place in an airtight container with layers separated by parchment. In the refrigerator they keep well for up to 3 days. For longer storage freeze baked sticks in a single layer until firm then transfer to a freezer safe bag for up to 2 months. Reheat from frozen in a 350 degrees F oven for 12 to 16 minutes until warmed through.
Ingredient Substitutions
If you need a dairy free option use a plant based shredded cheese that melts well and brush with a neutral oil instead of olive oil if you prefer. For a gluten free approach use an alternative ready made gluten free dough but expect a different texture and slightly shorter bake time. Swap oregano for Italian seasoning or add red pepper flakes if you like heat. Using part provolone in place of some mozzarella adds a sharper profile.
Serving Suggestions
Present the sticks on a long platter with small bowls of warmed marinara and a herbed olive oil for dipping. They pair nicely with a simple green salad or a bowl of minestrone for a heartier meal. For a party add a bowl of pickled vegetables to cut through the richness and scatter fresh basil leaves across the platter for color and aroma.
Cultural Background
The idea of twisting bread into decorative shapes has roots in many European baking traditions where shaping signifies celebration. These sticks borrow the Italian flavor palette of tomato sauce and mozzarella while using modern convenience dough. The candy cane motif is a playful nod to holiday customs making savory baking part of seasonal spreads rather than sweets alone.
Seasonal Adaptations
In summer swap marinara for a fresh cherry tomato compote and finish with basil. At Thanksgiving try a sage butter brush and a sprinkle of grated parmesan. For winter holidays keep the candy cane shape but add a small strip of prosciutto inside for a salty counterpoint. Adjust bake time slightly when fillings change moisture levels.
Meal Prep Tips
Assemble sticks on parchment lined trays and freeze them for quick entertaining. When hosting make a double batch and freeze half ready to bake. Label and date bags so you rotate inventory and thaw overnight in the fridge before baking. Keep small ramekins of warmed sauce in the oven set to low to maintain dipping temperature throughout service.
These candy cane shaped sticks are a small bit of theater with a lot of comfort. They prove that simple ingredients and a little imagination make gatherings more memorable. Give them a try and adapt the fillings to suit your taste so they become part of your seasonal traditions.
Pro Tips
Let the refrigerated dough come to room temperature for about 10 minutes so it relaxes and shapes without springing back.
Spread the sauce thinly and use a compact layer of cheese to avoid greasy puddles on the baking sheet.
Brush with olive oil before baking to achieve a deep golden crust and prevent the edges from drying out.
Seal the ends by pressing firmly to stop cheese from leaking during baking which can cause burning.
If freezing unbaked wrap each stick individually then place in a sealed freezer bag to avoid freezer burn.
This nourishing candy cane pizza bread sticks recipe is sure to be a staple in your kitchen. Enjoy every moist, high protein slice — it is perfect for breakfast or as a wholesome snack any time.
FAQs about Recipes
Can I prepare these ahead of time?
Yes you can assemble and refrigerate unbaked for up to 24 hours or freeze unbaked for up to 1 month. Bake from thawed or slightly chilled per the instructions and add a minute or two if needed.
What is the best way to reheat leftovers?
Reheat baked sticks in a 350 degrees F oven for 6 to 8 minutes to crisp them up. From frozen reheat at 350 degrees F for 12 to 16 minutes.
Tags
Candy Cane Pizza Bread Sticks
This Candy Cane Pizza Bread Sticks recipe makes perfectly juicy, tender, and flavorful steak every time! Serve with potatoes and a side salad for an unforgettable dinner in under 30 minutes.
Ingredients
Main
Instructions
Preheat and rest dough
Preheat oven to 425 degrees F and line a baking sheet with parchment. Allow the refrigerated dough to sit at room temperature about 10 minutes so it relaxes and is easier to shape.
Shape base rectangle
On a lightly floured surface unroll and press dough into a roughly 10 by 8 inch rectangle. Avoid overworking the dough to maintain tenderness and use fingertips to press for a pillowy finish.
Top with sauce and cheese
Spread 1/2 cup marinara thinly in the center leaving a 1/2 inch border then sprinkle 1 cup shredded mozzarella evenly to avoid excess moisture at the edges.
Cut and twist
Cut the rectangle into 8 lengthwise strips. Pair two strips press ends together twist into a spiral and curve the top into a candy cane hook sealing the tail end to prevent filling escape.
Brush and season
Brush each stick lightly with 1 tablespoon olive oil and sprinkle with 1/2 teaspoon dried oregano. Arrange on the prepared sheet leaving space for expansion.
Bake and rest
Bake at 425 degrees F for 10 to 14 minutes until golden and cheese is bubbly. Remove and let rest 3 to 5 minutes then garnish with fresh thyme or basil before serving.
Last Step: Please leave a rating and comment letting us know how you liked this recipe! This helps our business to thrive and continue providing free, high-quality recipes for you.
Nutrition
Did You Make This?
Leave a comment & rating below or tag
@aiolirecipe on social media!
Categories:
You might also like...

Fall Harvest Pasta Salad
A cozy, colorful salad that celebrates autumn flavors — roasted butternut squash and Brussels sprouts tossed with pasta, cranberries, pecans, and tangy feta, finished with a balsamic vinaigrette.

Cilantro Lime Steak Bowls
Bright, tangy cilantro-lime marinated flank steak served over rice with black beans, corn, fresh veggies and creamy avocado for a fast, healthy weeknight bowl.

Pecan Pie Crescent Rolls
Buttery crescent rolls filled with a sweet pecan pie–inspired filling — a quick, crowd-pleasing dessert perfect for holidays or weeknight cravings.
Did You Make This?
Leave a comment & rating below or tag @aiolirecipe on social media!
Rate This Recipe
Share This Recipe
Enjoyed this recipe? Share it with friends and family, and don't forget to leave a review!
Comments (1)
This recipe looks amazing! Can't wait to try it.
Comments are stored locally in your browser. Server comments are displayed alongside your local comments.
Hi, I'm Olivia!
What's Popular

30-Minute Meals!
Join to receive our email series which contains a round-up of some of our quick and easy family favorite recipes.